
For those whose kids are in some form of school, this is your PSA…Teacher Appreciation Week is coming up on May 8-12, 2017! This year’s National Teacher Day will be celebrated on Tuesday, May 9. Last year, I was ill-prepared so I definitely wasn’t going to let that happen this year, especially considering how awesome my son’s preschool teacher is! He absolutely adores her! We have seen tremendous growth in vocabulary, understanding, and even confidence!
I love practical gifts and since I live in a plastic bag-free city, I thought it would be fun to create a tote bag recognizing the hard work of a teacher. You can never have too many totes, especially if it’s cute like this one!
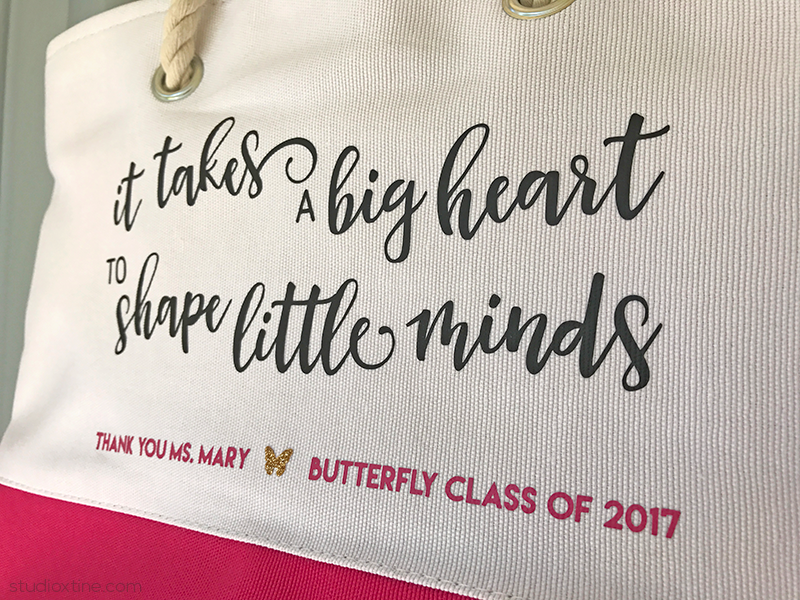
Isn’t the colorblock tote so cute and totally summery? It’s made by Imagin8 and can be found with the summer items. I got it at my local Michaels craft store for a little under five bucks!
This project is super easy to pull together and won’t break your budget! Who are you going to make one or two or three for?
For this project, you will need:
- Silhouette Design ID #145943
- Smooth Heat Transfer Vinyl in whatever colors you would like. I used black, dark pink, and glitter gold.
- Iron or Heat Press Machine
- Thin hand towel or cloth napkin (if using iron)
After downloading Design ID #145943 and opening it in my Silhouette Studio, I ungrouped and separated the words to better fit my project space. I did this because the totebag had a wider/horizontal space versus a taller/vertical space. Doing this meant the words/design would be more legible from a distance.
The most important step when doing a DIY heat transfer vinyl (HTV) project is to mirror your design. It’s the worst feeling when you forget to mirror the design and your Silhouette machine is cutting away your only piece of HTV!
When you have all the pieces cut out and weeded, center them in the appropriate space on the tote. Double, triple-check the layout, alignment, etc to make sure all is correct before ironing/sealing the HTV to the tote bag.
When you’re ready, place the thin hand towel or cloth napkin over the design and iron/press with even pressure. Note: if you’re using an iron, I recommend not “pushing” the iron across but rather press downward and hold for 15 seconds. Lift and press down again at a different spot. This method avoids any chance of your HTV accidentally getting scrunched or stretched.
Once you are confident all the HTV has been “transferred” to the tote bag, pull off the clear backing. At this point, I put the thin hand towel back over the HTV and iron one last time. And finally Voila! You have made a super cute customized tote bag for your favorite well-deserving teacher!
My favorite part of this project is using a butterfly icon as the text separator which is fitting for the preschool class name! 🙂
You should host a class! This looks great!! I’d love to make one for the end of the year! (Or 4, I guess, between teachers and assistant teachers!)
I’d love to make these with you! Let’s chat!