
I know I’m WAY ahead of myself here on holidays…Father’s Day is not until June 18 of this year (you better mark your calendar if you haven’t!) but this mama has a lot on her plate in June so I’m working backwards to make sure our Mr. Awesome Daddy has a special day and gift. As you will see on this blog, I am a BIG fan of the Silhouette machines, particularly the CAMEO®. Using this machine, I was able to design a personal and practical gift for my husband.
This desk calendar has two components: 4″x4″ picture frame on the left side and a mini 4″x4″ monthly calendar on the right side. The picture frame is great for those Instagram/square photos that can be so easily printed at Walgreens or another neighborhood print shop. I used Silhouette Design ID #42469 to create a little visual interest in the bottom right corner of the picture frame. The fun part of this gift is that my husband can swap out photos so it keeps the desk calendar exciting!
Want to make one for Father’s Day? Cut files and steps are listed below.
For the 4″x4″ Picture Frame:
- Download the 4″x4″ picture frame cut file. Note: the dotted lines are perforated lines to help with folding. Another reason why the Silhouette CAMEO® machine is so awesome!
- Download Lori Whitlock’s “The Best Dad Ever” Design from the Silhouette Design Store.
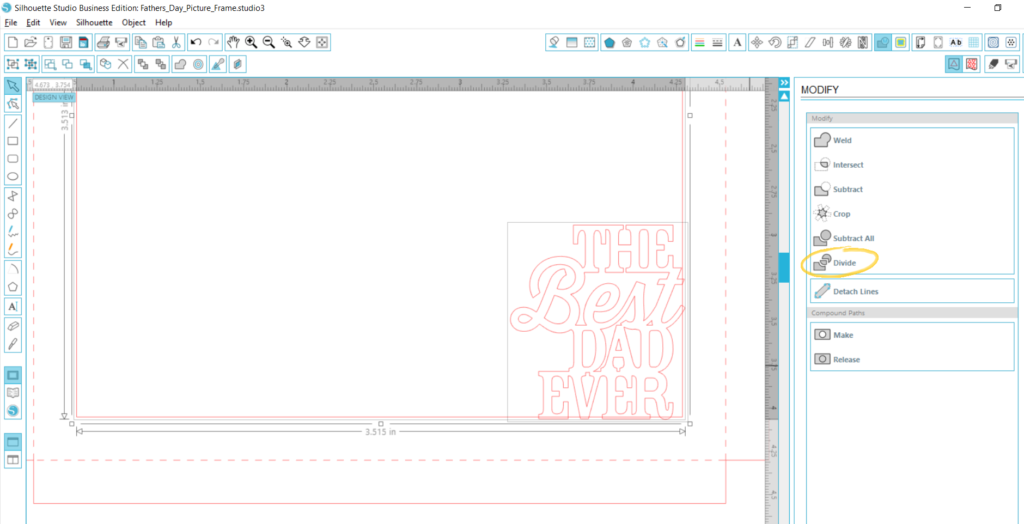
- Open both designs on the same blank file in your Silhouette Studio® software. Take the “The Best Dad Ever” design and scale it down however much you want. I did 20%. Place this design so that it slightly overlaps the picture frame on the bottom and on the right. See picture below.

- Click on the picture frame and select “Ungroup”
- Click on the inner frame line and the “The Best Dad Ever” piece and select “Divide” under the Modify Window. See picture below.

- Then click in a blank spot to de-select the pieces. Click on the “The Best Dad Ever” piece again and hit delete.
- Zoom in the places where the design overlaps the picture frame and start deleting. See picture below. See how the “t” in “Best” is now connected to the frame?

- Now you have a completed picture frame with a little fun detail in the corner!
- Send to your Silhouette and assemble! Fold where preforated lines are.
- Note: I used regular cardstock and used the Double Cut feature on my machine to make sure the cuts are clean.
- Note: You may need to trim your square photos a tiny bit so that it fits within your frame.
For the 4″x4″ Desk Calendar:
- Download the calendar PDF and cut using a paper slicer or scissors. Note: This desk calendar file goes through the end of 2017.
For the 4.25″x8″ Backing:
- Download the desk calendar backing cut file. Again, there are preforated lines to help with folding.
- Send to Silhouette to cut! I recommend using thick cardstock material for the backing.
- Once cut, I used scrapbook adhesive on the tabs and secured it to the back. Note: You can angle the main panel however much you want. See below where I placed my tabs.
