This blog post contains affiliate links. By purchasing through a link, Studio Xtine may receive a small commission that will help keep the blog running but more importantly, keep you crafting with me. 😊
A police-themed birthday party obviously needs police badges. Shiny gold badges.
Turns out I didn’t find any I liked online so decided to channel my inner Marie Kondo and make use of what I had instead of buying something that didn’t “spark joy.” Silhouette has so many specialty materials so their Printable Gold Foil sheets were PERFECT for this simple DIY project.
If you want to learn how to make your own custom police badge, follow along!
Supplies used:
- Silhouette CAMEO or Portrait
- Silhouette Cutting Mat
- Silhouette Printable Gold Foil (link)
- Xacto Knife (link)
- Design ID#229962 (link)
- Design ID#34910 (link)
- Design ID#82024 (link)
Step One: Create Gold Badge Design
- In Silhouette Studio, open Design ID#34910 and remove the text “Super Friends” as we only need the shield shape for this project. Make shield shape 2.25in wide by 2.565in tall.
- Next, under the Offset Panel, create an internal offset of 0.125in of the shield.
- Increase line thickness of the internal offset shield to 1.75pt and change line color to black.
- Add Design ID#82024. Right-click and ungroup, and keep only the two arched ribbon pieces (the light green and medium green pieces, I did not use the dark green triangular piece).
- Select both green pieces and do the following:
- Center-align, then top-align, and then group together.
- Change object length to 1.5in
- Change fill color to transparent
- Change line color to black
- Increase line thickness to 1pt
- Move the grouped arched ribbon piece near top of the badge.
- Select the grouped arched ribbon piece and under the Replicate Panel, choose Mirror Down. Then increase object length to 1.725in and height to 0.575in. Move the mirrored arched ribbon piece near the bottom of the badge.
- Add Design ID#34910. In the Scale Window, click Lock Aspect Ratio and change star height to 0.75in.
- Create a 0.832in circle with line thickness of 2pt. Make line color black.
- Select both circle and star and center-align. Nudge the star up/down/left/right so that it appears centered inside the circle. Then group together and move it between the arched ribbon pieces.
Step Two: Add Text
- Type the word POLICE in font of your choice and resize so that it looks like it would fit inside the top arch ribbon piece.
- NOTE: For reference, I used the font Gotham Black in 16pt font size.
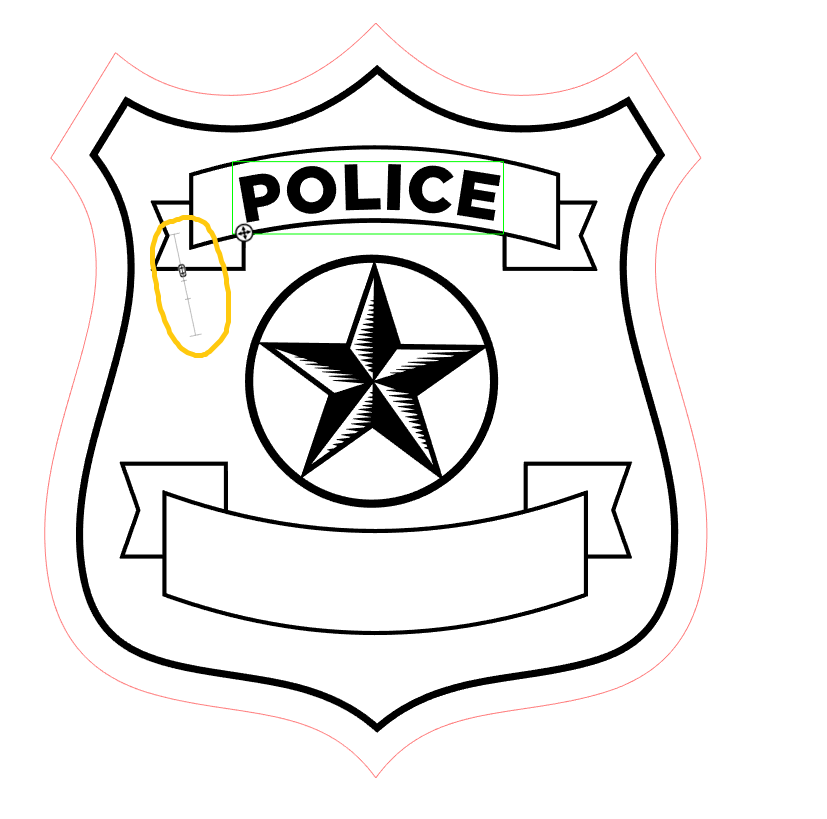
- Double-click on your text, click on the cross-hair symbol on the bottom right of the text, and drag entire text box to the bottom arch line of the arched ribbon piece. It should “snap” to the arch line.
- Once it’s “snapped”, you can use the height adjuster (near bottom left of the cross-hair symbol) to move your now curved text up or down.
- Repeat the same steps to add text on bottom arched ribbon piece. For our badges, I added the party guest’s name in the same font but at a larger size.
- Type the word POLICE in font of your choice and resize so that it looks like it would fit inside the top arch ribbon piece.
- NOTE: For reference, I used the font Gotham Black in 16pt font size.
- Double-click on your text, click on the cross-hair symbol on the bottom right of the text, and drag entire text box to the bottom arch line of the arched ribbon piece. It should “snap” to the arch line.
- Once it’s “snapped”, you can use the height adjuster (near bottom left of the cross-hair symbol, see yellow circle below) to move your now curved text up or down.

- Repeat the same steps to add text on bottom arched ribbon piece. For our badges, I added the party guest’s name in the same font but at a larger size.
Step Three: Print & Cut
- Repeat Steps 1 and 2 until you have all the badges and names needed.
- Once you have your design, simply load the gold foil sheet in your printer’s feeder tray (correct side up)
- Then place printed sheet on your Silhouette cutting mat and send to Silhouette with the proper cut settings to cut.
- NOTE:
- Flip over each badge and use an Xacto knife to lightly score a line. This will make it easy to separate the backing from the adhesive badge.
- Once you have your design, simply load the gold foil sheet in your printer’s feeder tray (correct side up)
- Then place printed sheet on your Silhouette cutting mat and send to Silhouette with the proper cut settings to cut.
- NOTE: If you do not have a die-cutting machine like the Silhouette or Cricut, you can also cut out the badges with good ‘ol scissors.
- NOTE: For this particular project, I actually set my blade depth higher so that each badge was cut out from the sticker sheet. If you choose to do it this way, flip over each die-cut badge and use an Xacto knife to lightly score a line. This will make it easy to separate the backing from the adhesive badge.
I made a couple blank ones just in case younger siblings wanted one. These gold police badges were a hit! The partygoers loved pretending to be police officers for the day!